I am an avid podcast listener and am always on the lookout for a great new podcast.
I had a new one on my list I was excited to listen to that sounded like it would be killer. Everything from the content to the host to the intro music made me think this podcast would be really good. But sadly enough, I didn’t make it more than 30 seconds into the podcast before I had to turn it off. The quality of the audio was so bad that it was actually painful to listen to.
It doesn’t have to be this way. If your podcast is painful to listen to or the audio quality is bad, no one will listen to it! Thankfully, with the advancements in technology, you can surprisingly have a good recording setup wherever you are at an affordable price. Sure you can spend thousands of dollars on the most expensive equipment (and we have) but this will not solve all of your problems. If you don’t know how to use these expensive tools then you may still be left with a poor-sounding recording. What matters most is not what tools you have, but how well you know how to use them.
In this post, we will cover everything you need to learn to start recording your podcast.
What you need to record a podcast
At Resonate, we believe in excellence. We believe that a high-quality podcast needs to have a high quality sound. We also believe that you don’t have to break the bank in order to create a top-notch show.
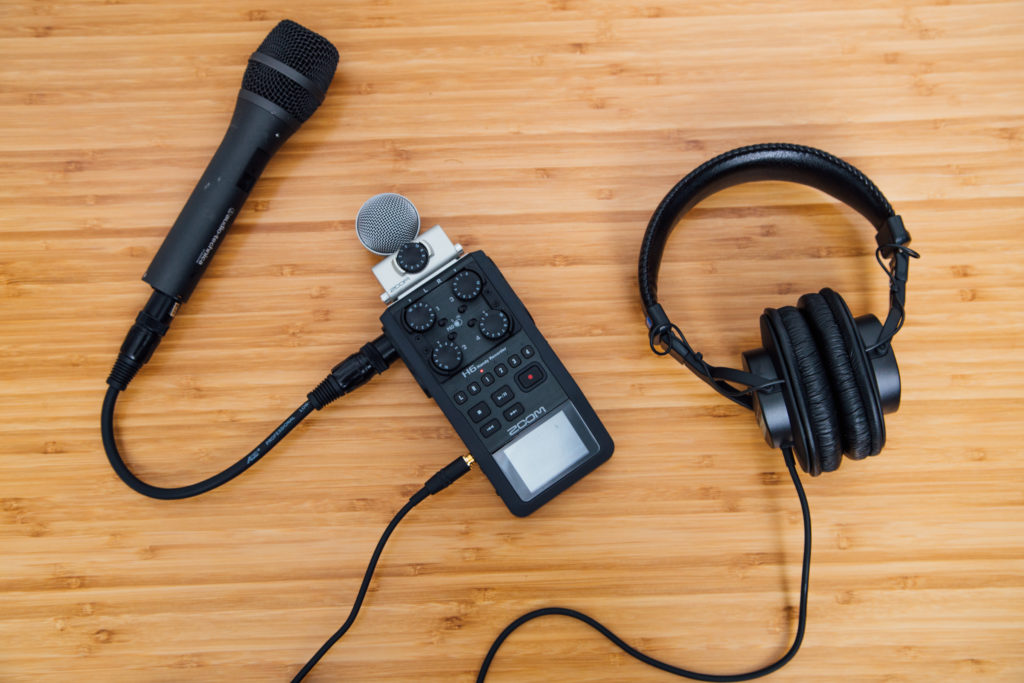
All you need is a good dynamic microphone, headphones, a few accessories like a pop filter, a laptop, free recording/editing software like GarageBand or Audacity, and a quiet room to record and you can capture some amazing audio.
In this post we’ll show you everything you need to buy to get started. But before you can hit record, you need to find a quiet room to record. So let’s talk about how to find a quiet recording environment.
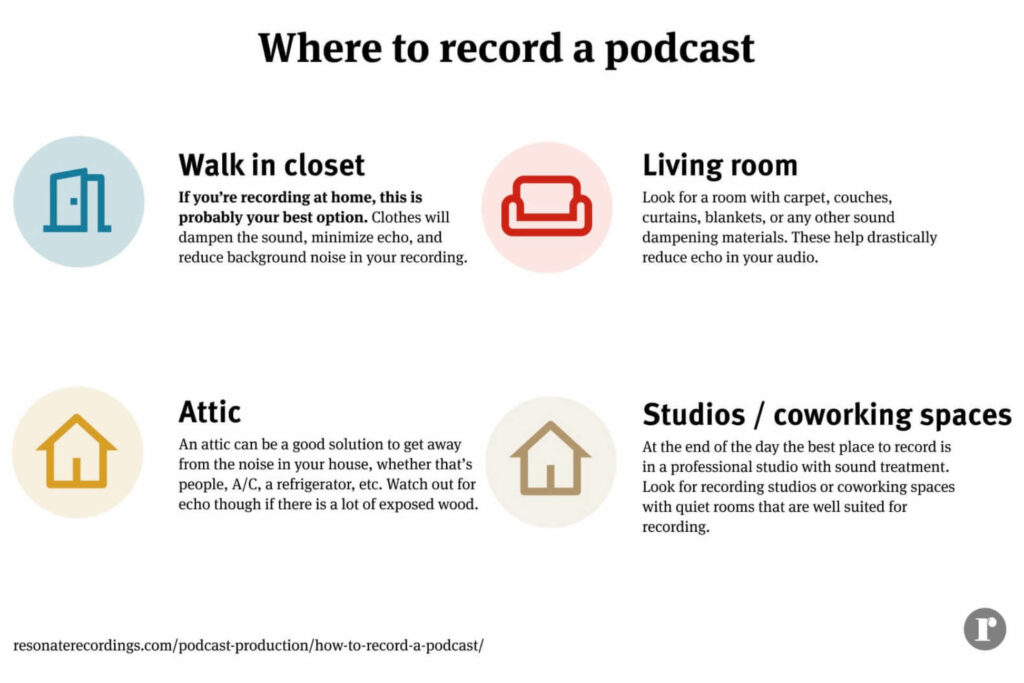
Where to record a podcast
As soon as you hit record on your podcast, whatever happens in the background will be forever etched in the digital DNA of your recording. Translation? It’s vitally important to choose the right recording environment in order to have a high quality recording that’s worth listening to.
It’s really important to spend a little time & be intentional about these things to give you the results you’re looking for. While there might be some necessary variations in recording setup and environment as needs differ, the reality is there are a few transcendent necessities (whoa, college!) to consider to make your recording sound great.
Our team is trained (like, “Hey I got a couple degrees for this”, trained) to edit, mix & master your recordings with professional quality. But even with our expertise we are sometimes limited on what we can do.
- No. We cannot magically remove the cell phone ringing that’s embedded in your audio while you’re unpacking that deep thought.
- No. We can’t hide the baby crying or the ambulance siren blaring just as your guest is pouring out their heart.
- No. We can’t take that recorded phone call of your college professor who’s talking to you in the middle of a hurricane & make it seem like they are on a tranquil beach in Maui.
While some level of background noise reduction is possible, the best way to reduce background noise and distracting sounds is to prepare your recording environment. “We’ll fix it in post” is not always a reality.
Here’s how we recommend choosing the right room to record your podcast.
Record your podcast in a small room with lots of padding
Walk in closets are great because they usually have tons of clothes hanging that will naturally dampen sound. The key to finding a good room to record in is one that is “dead” with little room noise.
Other great natural sound absorbing materials that may help your room are couches, beds, carpet, rugs, chairs, etc. You can also buy basic studio foam to help dampen a room. Another affordable option is egg crate foam that you can buy at a craft store.
💡 Pro tip: To determine how much room noise your room has, simply clap or snap your fingers and listen for an echo or slapback sound. If you do not hear an echo or slapback, then it might work well.
Best places to record:
- Walk in closets
- Living room with carpet, couches, pillows, and curtains
- An attic far away from noises in your house
Minimize background noises before you record
You may be surprised at all the sounds you will hear and pick up when you are trying to record, especially what you can hear while monitoring through headphones. For this reason you will want to pick a location that has few natural sounds such as HVAC’s, fans, computers, etc.
Be aware that some lights actually put off sounds that can be picked up by your microphones. If possible turn off the A/C, heater, and any other natural sound making devices while you are recording. Also make sure you and your guest put your phones on do not disturb so that you don’t hear any notifications or vibrations from your phones.
Use professional sound treatment to dampen background noise (optional)
We realize that some people may want to jump into their podcasting venture with enthusiasm & vigor. They want to ensure that if they do it, they do it real big. More power to you! You can certainly invest a lot of money into making a quality home recording studio. And you will certainly see fruits from your labor if you do it right. Some people may want to look for others ways to reduce & dampen the sound in their room.
Some choose to purchase a portable vocal booth for their setup. Acoustic foam is another popular way to dampen the reverb/echo in your room. Or, if you want to swing for the fences, there are even full-room treatments available as well. And if you want to get real crazy you can even rent or buy a portable sound booth in any number of variations. The sky’s the limit and there are plenty of good, quality, professional options out there for people who want more for their recording environment than just the au-natural feel of home-sweet-home.
Want to learn more about how to create a professional podcast studio in your home? Check out 12 Expert Tips to Create the Ultimate Podcast Space.
How to record a podcast remotely
Learning how to create a studio-quality podcast remotely is more important than ever now. So many podcasts miss out on this so please pay attention and takes notes on this point.
The podcast double-ender method
At the end of the day, the best way to remotely record a podcast is the double-ender method.
The double-ender method is when you and your guests all record your audio locally then combine all the files in editing later.
The best way to do this method is to use Quicktime or GarageBand on Mac, Audacity or the built-in recorder on Windows, or any other software that works offline.
The benefit of recording offline is that if anyone’s internet connection is unstable the offline recording will continue to run smoothly in the background. This same concept is exactly what the tools like Squadcast, Zencastr, and the Resonate Remote Recorder use to help you capture the highest quality audio possible. We’ll dive into those tools next.
💡Pro tip: We recommend recording remote interviews using one of the tools below like Squadcast, then starting a backup recording on Quicktime or something else just in case someone’s internet crashes.
Squadcast (best for reliability)
Squadcast is our favorite remote recording tool. They have consistently improved their reliability and built out new features that we love. This is our top recommendation for new podcasters looking for a reliable remote recording solution.
Key features:
- $20/mo for 5 hours of recording
- Record 1 host + 3 guests, you can record up to 9 guests in their Pro plan
- Audio, video, and screen share recordings
- Progressive uploading
Riverside (best for video podcasts)
Riverside is a cutting-edge brand in the space that has pushed the boundaries for video podcasting remotely. With Riverside you can capture crystal clear 4k video and high-quality audio for your remote podcast. We are using Riveride more and more with our clients, and recommend this platform for anyone looking for a way to capture a higher quality video than Zoom or Google Meets can offer.
Key features:
- $7.5/mo for 2 hours of recording
- Audio, video, and screen recordings
- Live stream your video to Twitter/YouTube/Facebook
- Accept live call-ins
- Record up to 8 participants
Resonate Remote Recorder (best all-in-one experience)
Resonate’s Remote Recorder lets you record studio-quality remote recordings in the same app you use to manage your podcast production, host content, and see analytics.
Key features:
- $20/mo for unlimited recording time
- Record up to 10 participants
- Progressive uploading
Zencastr (best free option)
Zencastr is a great free remote recording platform that rivals Squadcast in many ways. The biggest benefit to Zencastr is that they offer a free plan. The only limitation is that you can only record an MP3 as a part of their free plan, which means you get a small reduction in audio quality.
Key features:
- Free for unlimited recording in MP3 quality
- $20/mo for unlimited recordings in 16-bit 48khz WAV
- Progressive uploading
- Record up to 6 participants (in beta)
Zoom (Best for beginners)
Zoom is the most common way to record a long-distance podcast. It’s easy, intuitive, and most people already have it downloaded on their computer for work. When it comes to quality, Zoom is lagging very far behind these other platforms listed above. Because Zoom does not record your audio or video locally, it leads to a much lower quality sound. It would be better to use Squadcast or Zencastr (for free), but if you are looking for a fast way to record a long-distance call for your podcast, Zoom is one of the most convenient options.
Key features:
- $15/mo for recording 2+ guests
- Record up to 100 participants
- Record onto your computer or to the cloud
To summarize, we recommend Squadcast for their reliability, Riverside for it’s 4k video quality, and our very own Remote Recorder for a streamlined podcast creation experience. Choose the right tool for you, then it’s time to find the right equipment and hit record.
Recommended reading: How to record podcasts remotely
Best equipment for podcasts
Choosing the right podcast equipment is crucial to creating a professional sounding podcast. The beauty of modern recording technology is that you don’t have to spend thousands to achieve a high-quality sound. However, you do need to make the right choice about which gear to use, and then make sure you know how to properly use it.
Microphones for podcasts
Choosing the right microphone to record your podcast is one of the most important steps to getting a professional sound. We don’t think you have to spend very much money, though, in order to get a very good sound.
Don’t use the built-in microphone on your computer or smartphone unless it’s your only option. These mics were not built for professional recording and will greatly cheapen the sound of your show.
There are several types of microphones to choose from:
- Dynamic: Best for podcasters, pick up less background noise
- Condenser: Lower noise floor, clearer sound, pick up much more room sound and background noise
We recommend getting a dynamic microphone like the AT2005 or Samson Q2U. They are affordable, easy to use, and will pick up very little background noise since they are dynamic mics.
Dynamic microphones are the best microphone for podcasters because they pick up the least amount of background noise compared to other mics. Condenser microphones, however, pick up much more of the sound in the background or in the room, so they will reveal much more clearly how good your recording environment is (or is not).
USB microphones
USB microphones are great because they let you connect directly to your computer and hit record. There are a lot of affordable USB mic options that sound great. If you’re a new podcaster, we recommend starting with a USB mic so you don’t have to buy an audio interface to record.
XLR microphones
XLR microphones connect through a tri-pronged cable into an audio interface, then to your computer. You can also connect them directly into a handheld recorder like the Zoom H6. Many of the most popular microphones for podcasters like the Shure SM7B (Joe Rogan’s mic) or the RE20 are XLR microphones.
If you use an XLR microphone, we recommend recording into a Zoom H6 handheld recorder or through an audio interface like the Sound Devices MixPre-3 or Universal Audio Apollo Twin.
Using an XLR mic and an interface can bump the quality of your podcast up, but a simple USB mic is an excellent option for many podcasters.
Our podcast microphone recommendations
The AT2005 and ATR2100x microphones are nearly identical USB microphones from Audio Technica – that means they can plug directly into your laptop without the need for an expensive audio interface. But the unique selling point of the ART2100x is that it comes with 3 cable connection options: usb C, USB C to USB A, and an XLR connection. So if you want to set yourself up for more versatile recording situations (eg recording into a handheld Zoom H6) then we recommend starting out with the ATR2100x. The Samson Q2U is another reliable USB mic that is the cheapest mic we recommend. It’s a great option if you’re on a tight budget.
Mics we recommend:
- AT2005 ($79)
- ATR2100x ($99)
- Samson Q2U ($69)
Recommended reading: The ultimate podcast microphone guide
Using headphones for podcasts
We recommend that you buy some affordable podcast headphones to track your podcast. The recording will lock in sounds from your background forever, so it’s important to listen while you record so you can catch distracting background noises (like sirens) in the background, then stop talking until those distractions stop.
Wearing headphones is especially crucial when you are recording remotely, so that you don’t record the sound of your guest speaking through your computer speakers through your microphone.
Best headphones for podcasters:
- Apple earpods ($15)
- Apple AirPods ($119)
- Audio Technica ATH-M20x ($69)
- beyerdynamic DT 770 PRO’s ($159)
Recommended reading: Best studio headphones: The ultimate podcasters guide
Using a laptop to record podcasts
This guide assumes that you already have a laptop of some sort that you could use to track your podcast. We recommend software options for both Apple and Windows computers, so no worries if you don’t have a super new computer, you can still make it work.
Some podcasters choose to skip the laptop and record with a handheld recorder. This works really well when you are tracking your podcast in person. But we recommend using a laptop because it will come in handy when you need to edit your podcast, coordinate interviews, publish and market your episodes.
Field recorders
Portable field recorder recorders are a great for several use cases:
- If you need to record 2+ XLR microphones in person
- If you need a quick and easy way to capture interviews, foley (sound effects), or a full episode on the go
- If you don’t have a laptop to record your podcast
- If you need a 2-in-1 handheld recorder and audio interface
Our favorite field recorder is the Zoom H6. It’s lightweight, fits in the palm of your hand, can record up to 4 inputs (upgradable to 6), captures high-quality sound effects through the mic attachment, lets you record directly into an SD card, and you can use it as an audio interface if you want to record with your computer.
We also love the Sound Devices Mix Pre 3. It’s a step above the Zoom H6 in terms of quality, and can function as an all-in-one recording device and audio interface.
Here’s the equipment you need to record with the Zoom H6:
Recommended reading: How to record a podcast with a Zoom H6 recorder
Best software for starting a podcast
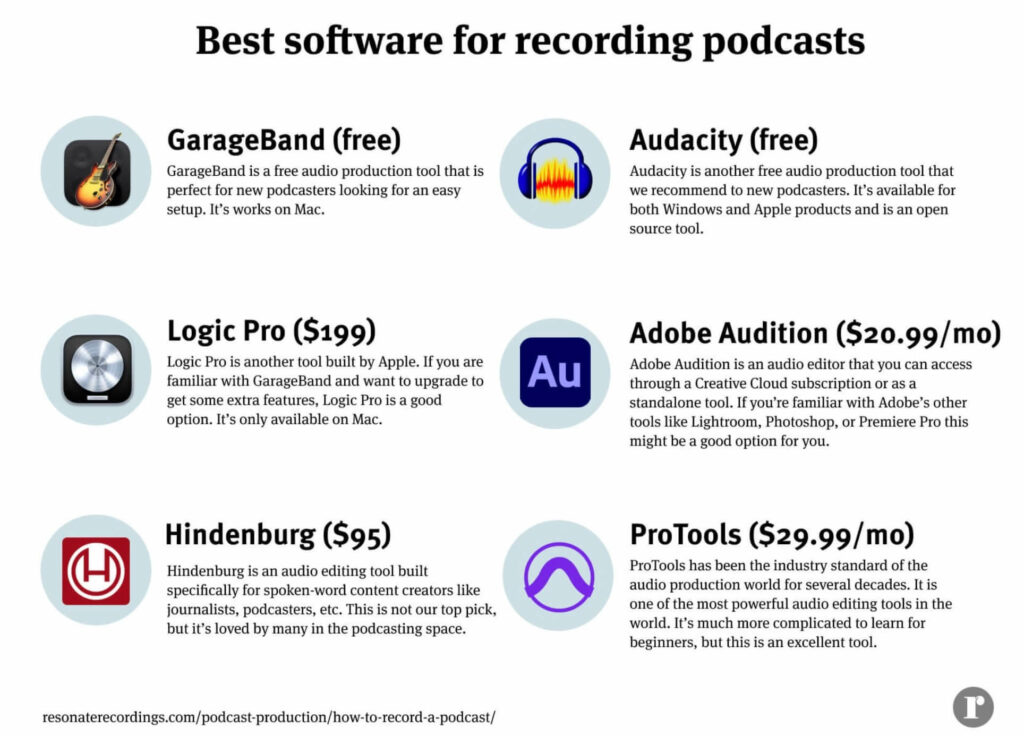
Whether you record your podcast on a field recorder or straight into your laptop, you will eventually need to get some software to review and edit your recordings. Here is the best software to get started.
Garageband for Mac (free)
GarageBand is the native digital audio workstation (DAW) that is installed freely on each apple product (Mac, iPhone, iPad). It’s a simple program, but don’t let that fool you. With practice and experience, you can create an excellent podcast using GarageBand alone.
You can record your podcast into GarageBand, organize and edit your recordings, and even do some light mixing using their built-in plugins if you wanted. Learn the basics in our tutorial video on 11 tips for podcasting with GarageBand.
Audacity for Windows (free)
Audacity is a free open-source DAW that works for both Windows and Mac. Audacity is praised in the podcast community as an excellent starter tool for podcasters. In fact, even some more experienced podcasters like to work in Audacity still.
Learn the basics of Audacity in our in-depth tutorial video here.
Paid for podcast software
Want to step up your editing game with some professional editing software? There are several paid tools that help you edit your podcast like the pros.
ProTools ($29.99/mo, $299/yr, $599 perpetual license) is the number one industry standard tool for audio production, in the music industry and the podcast industry. Because ProTools has been an industry leader for so long (decades), it is used in studios around the world, and is a sort of universal language for audio engineers.
Because it’s so powerful, it will take much longer to learn how to use it. But if you do learn, you’re setting yourself up with a set of skills that can be used in many contexts in the future. However, if you don’t plan on becoming a skilled podcast editor and you just want to be able to make some simple edits, we’d recommend sticking to GarageBand or Audacity for simplicity.
Want to test out ProTools? You can use ProTools First for free, a stripped down version of this powerful tool.
Adobe Audition (7-day free trial, $20.99/mo, $239/yr) is an audio editing tool built by Adobe that follows the same design and workflow as Premiere Pro and their other software. If you have any experience with Adobe’s Creative Cloud suite, then Audition might be a good solution for you. Since it’s included in a Creative Cloud subscription it’s a great tool to bundle and save so you can get audio, video, photo, and design tools in an all-in-one package.
Logic Pro (90-day free trial, $199) is Apple’s high-end DAW built with the same interface style and workflow as GarageBand. If you spend a lot of time in GarageBand but want to get access to more features and bandwidth, then Logic Pro is a great upgrade.
Hindenburg Journalist (30-day free trial, $95) is a DAW built for journalists, podcasters, and spoken-word content creators. They put the features that are most important to spoken-word content creators front and center in the design of this product to make it easier for everyone to use. While this is not our top recommendation, they are a respected brand in the podcast space that is well worth mentioning.
Recommended reading: What is the best podcast software?
Podcast accessories
Buying a good microphone stand and a pop filter can greatly improve the audio quality of your podcast.
We recommend using a microphone stand with a boom arm rather than a tabletop stand because tabletop stands tend to pick up even small movements on the surface of your table that can interfere with your listeners’ experience.
A pop filter helps reduce plosives (popping “p” sounds) and sibilance (“s” sounds) to capture a cleaner listening experience for your audience.
Recommended reading: 5 essential podcast accessories to improve your recordings
Summary of our equipment recommendations
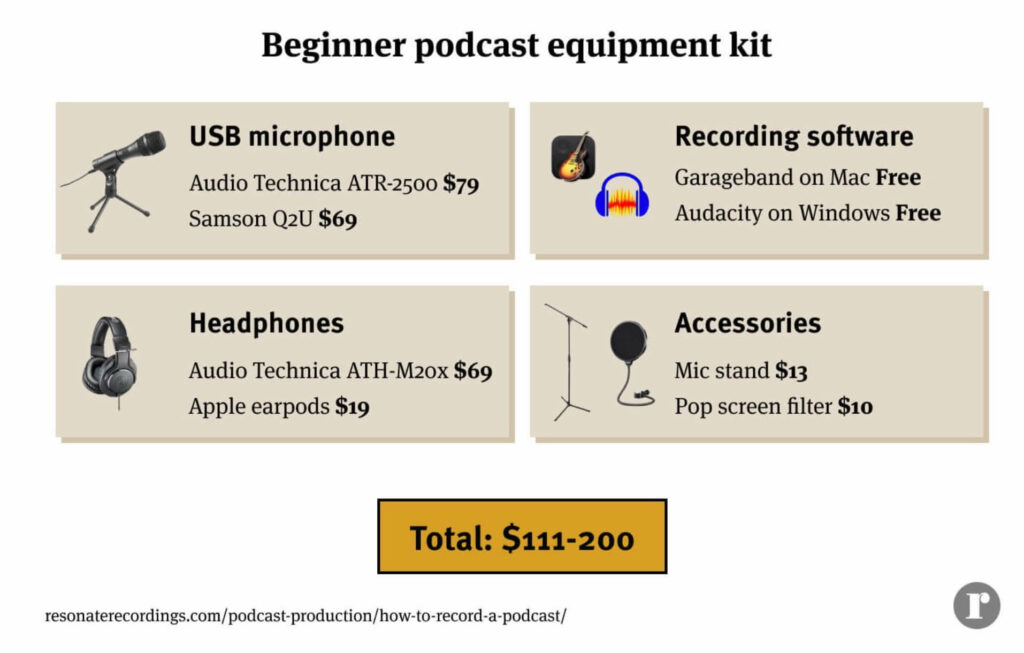
Beginner podcast setup ($161-$200)
Our beginner podcast setup simply requires you to buy a USB microphone, headphones, a mic stand and a pop filter. By spending less than $200 you can majorly upgrade your podcast audio quality and sound like a professional.
- Microphone – Audio Technica AT2005 USB ($79) or ATR2100x ($99)
- Headphones – Audio Technica ATH-M20x ($69)
- Laptop – Mac or Any PC (Price not factored in)
- Software – Garageband (Mac) or Audacity (Windows) (Free)
- Accessories – mic stand with a boom arm ($13), pop screen filter ($10)
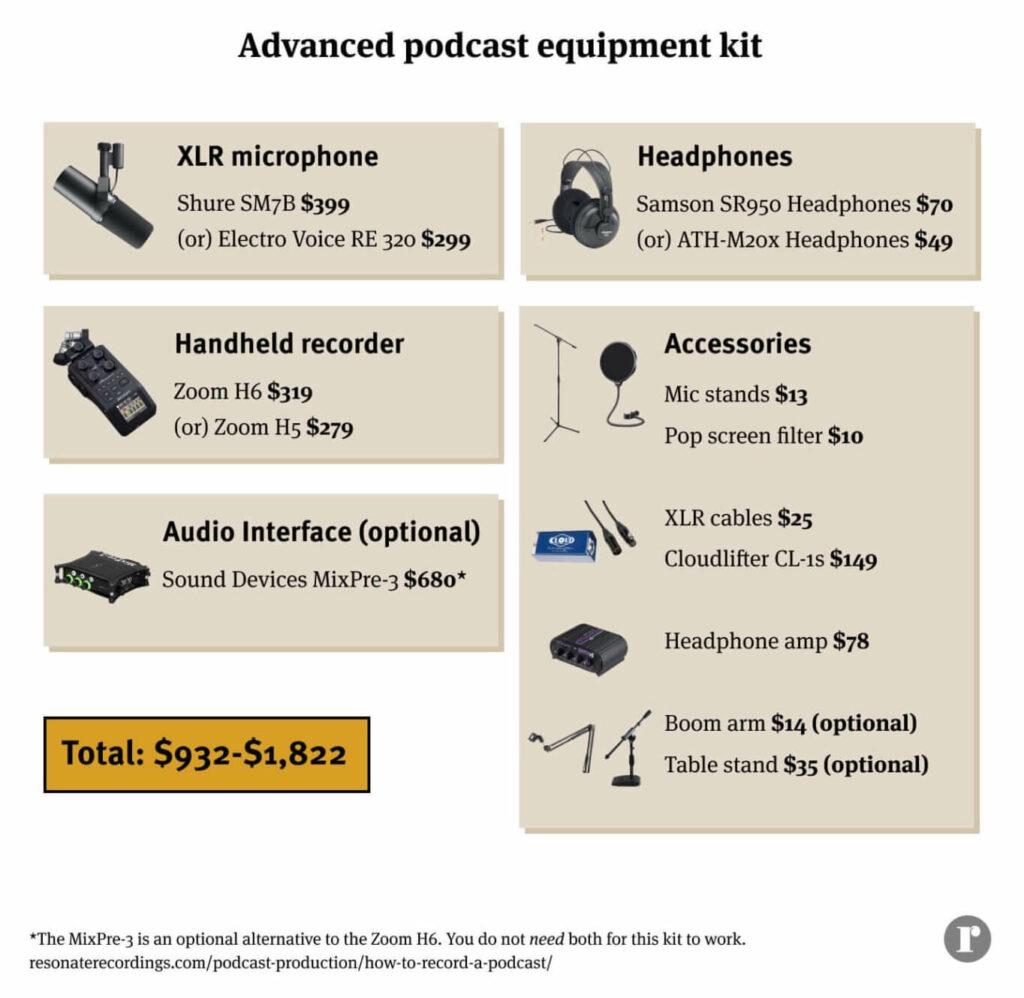
Advanced podcast setup ($932-$1,822)
Our advanced podcast setup is for podcasters who want to step up their audio quality even more.
- Microphone – Shure Sm7b ($399)
- Cheaper alternative – Electrovoice RE 320 ($299)
- Headphones – Samson SR950 Headphones ($70)
- Cheaper alternative – Audio Technica ATH-M20x Headphones ($49)
- Audio Recorder – Zoom H6 ($319)
- Cheaper alternative – Zoom H5 ($279)
- Optional upgrade – Sound Devices MixPre-3 ($680)
- Accessories
- Mic stands ($18)
- Pop screen filters ($10)
- XLR cables ($25 x 2 cables)
- Cloudlifter CL-1s ($149)
- Headphone amp ($78)
- Boom arm (optional) ($14)
- Table stand (optional) ($35)
Recommended reading: Find the perfect podcast equipment for every budget
Methods for recording a podcast
Choosing the right equipment and recording tools for your podcast are decisions that directly influence each other. The type of microphone you use will impact what recording tools it is compatible with, and the type of recording equipment you buy will similarly exclude certain microphones or cable connectors.
There are many different methods for recording a podcast, from simply recording with your iPhone all the way to renting out professional studio space.
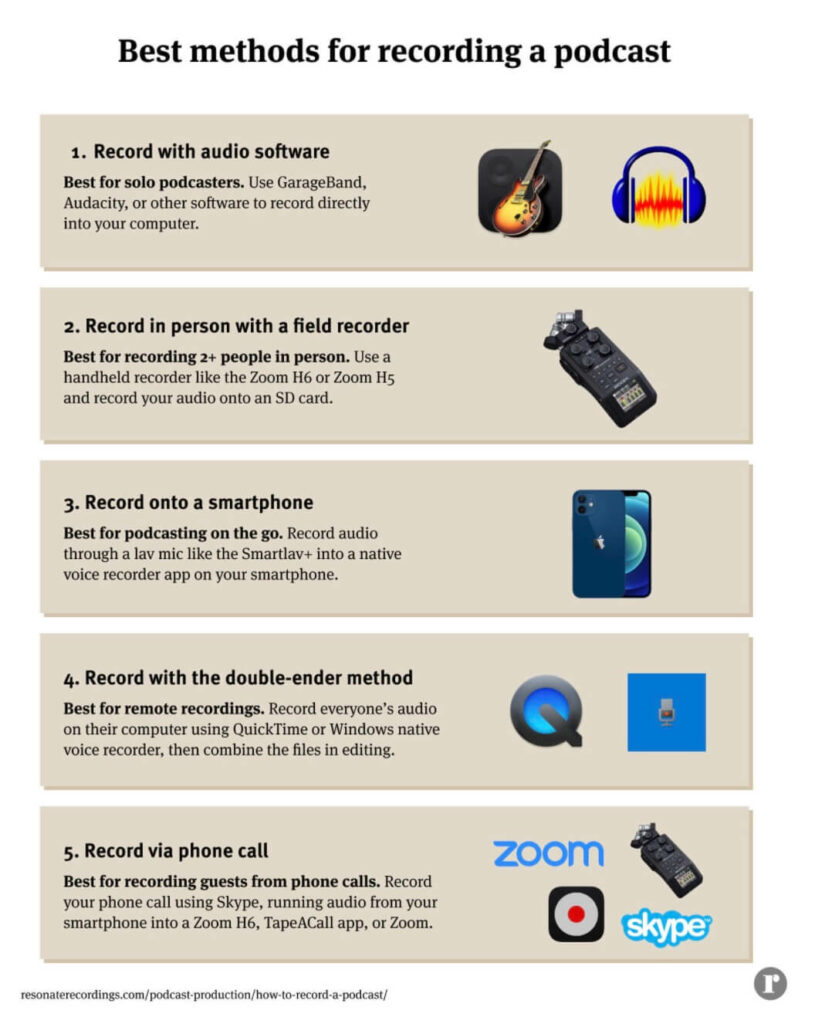
Recording with audio software
If you are a solo podcaster, the easiest way is to record directly into your laptop onto software like GarageBand or Audacity. These programs are free and will come in handy for doing some light editing of your show as well.
If you are recording multiple guests in person, then recording with audio software might be more complicated. You’ll need to buy an audio interface and multiple XLR microphones in order to capture multiple mics in your computer at the same time. This also requires understanding your software well enough to set up multiple channels and set the proper inputs. Because this takes some more work, some people prefer to bypass the laptop and use a field recorder instead. We’ll talk more about that in a minute.
Recording in person using a field recorder
Field recorders like the Zoom H6 are the easiest way to record multiple microphones in person at the same time. You simply plug in your XLR microphones, insert an SD card, and click record. They are also great tools to have for recording sound effects or interviews while you’re on the go. Learn how to record on the Zoom H6 in our guide here.
Equipment You Need
Recording a podcast onto a smartphone
Recording a podcast on your smartphone should be more like a last resort than a first-pick for most people. Although platforms like Anchor have made it easier than ever to just start recording from an app on your phone, their audio quality is almost never as good as recording through a handheld recorder or laptop (mentioned above). While there are some decent bluetooth mics, lav mics, and different adapters for recording directly from your iPhones, we try to recommend this setup the least. It takes a lot more work to get the same quality of audio from a smartphone at this point in time.
But with that being said, if you are going to record on your smartphone we recommend using a lav microphone like the Smartlav+ instead of your built in mic. This mic is built for recording on smartphones and connects via a TRRS cable (1/8″). If you are using an iPhone 7 or later and don’t have a headphone jack you can purchase this lightning to 3.5MM adapter to connect the mic to your phone.
Once you plug in your lav mic, you can use your phone’s native voice recorder, Anchor, Spreaker, Podbean, or any other voice recording apps.
Equipment you need
- Rode Smartlav+ ($59)
- Lightning to 3.5MM adapter (if you have iphone 7 or later)
- iPhone or android smartphone
- Native voice recording app, Anchor, Spreaker, or Podbean
Record a podcast with the double-ender method
We touched on this earlier in the article, but the double-ender method is the best way to capture a phone call in high quality. All you have to do is record yourself and your guest individually on each end of the call, use your phone/Zoom/Google Meet/etc to hear each other talking, then combine the 2 separate audio files in editing. If done correctly, the end result can make your podcast sound like you and your guest are actually in the same room at the same time.
If you want an easier way to achieve the double-ender method, you can also simply use Squadcast or Resonate’s Remote Recorder. However, the best way to do the double-ender method is to bypass the internet entirely by recording on a local platform like Quicktime, GarageBand, Audacity, or Window’s native voice recorder.
Recording a podcast via phone call
There are several ways to record a phone call, including running your phone through the Zoom H6 handheld recorder, the TapeaCall app, simply using Zoom, or Skype + AudioHijack. You can read step-by-step instructions on how to record a phone call so that your guest just has to dial in and start talking in this blog.
Best practices for recording a podcast: Read this before you hit record

We’ve put together this quick checklist of best practices for recording a podcast to ensure that each episode of your podcast audio is consistent, professional, and success. Once you’ve found a quiet recording environment, added any necessary sound dampening, and set up your equipment it’s time to do a couple final tests before hitting record.
Remember, it’s better to put the extra forethought into the pre-production phase to save yourself dozens of hours in the post-production phase fixing low-quality audio, removing (or attempting to remove) distracting background sounds, or rerecording content that was accidentally deleted or never recorded in the first place.
Best practices for recording a podcast:
- Plan ahead for your podcast: Script each episode
- Set proper recording levels for your podcast
- Monitor your podcast with headphones
- Record a backup
Plan ahead for your podcast: Script each episode
A podcast script breaks down what you plan to talk about during one episode of your podcast. Creating a script for your show is one of the best ways to prepare for recording and improve the quality of your content. Show up for every recording with a general idea of what you hope to discuss, and try to think of what topics, questions, or ideas would be most interesting to your target audience.
There are many ways to design a podcast script, but a simple script includes some basic elements like your intro, call to action, main talking points, etc.
Example podcast script:
- Intro
- Call to action (subscribe, read the show notes on our website, etc)
- Main talking point 1
- Transition
- Main talking point 2
- Transition
- Outro
- Call to action
Throughout the recording, glance at your script to make sure you are staying on track.
Set proper recording levels for your podcast
The last element when recording your podcast is finding the correct recording level. Recording too high levels can cause distortion or clipping, and recording with the gain too low may cause hissing or hollow sounding narration.
Whether you are using an outboard mic preamp, an interface, a handheld recorder, or a usb mic there should be an adjustable gain setting. (If you need help finding this adjustable gain setting on your device, please contact us.) So now that you have found your adjustable gain setting, what is that magic level you should record your narration? A good rule of thumb is to have your mic peak around -10 to -12 dB. This means at the loudest part of your recording the level should go no higher than -10dB. Most recording devices have these numbers listed on a visual meter. However, if your device does not have these numbers listed, try to stay in the green or about halfway up your meter. If you cannot find a visual meter on your device, well this leads us to our next point…
Monitor your podcast with headphones
It is important that you have a way to monitor and listen to what you are actually recording. Even if your device has an excellent visual meter to check your recording level, we recommend you be a skeptic and never trust your eyes. In our world you must learn to only trust your ears. For this reason we recommend someone always monitor your recording with high quality, closed back headphones when recording. Monitoring your audio in real time will enable you to quickly recognize and address any issues with your recording. It is not sufficient to use earbuds or other cheap headphones. With these, you may not be able to hear and quickly identify issues with your recording.
Record a backup
After helping podcasters produce over 20,000 episodes and counting, our team has heard far too many tragic stories of lost or accidentally deleted recording sessions. Recording a second copy of your podcast is an important final step to foolproof the recording process. Our go-to choice for recording a backup of your podcast is our very own free online voice recorder. The recorder can easily be set up to record a redundant copy of your podcast in the background through Google Chrome.
For example, if you are recording your podcast on Garageband or through Zoom, simply go to the free online voice recorder on Google Chrome, click “Start Mic Check,” follow the prompt to allow access to your mic, select your mic by clicking the icon in the browser window (top right), and press record. When you are finished recording, you can directly download the recording to your laptop and save it as a backup.
Even if you don’t record a secondary copy of your podcast audio, it never hurts to save a duplicate of all your files in the cloud or on an external hard drive. You may not get a second chance nailing that interview with your high-profile guest again, so putting in some extra effort to foolproof your production is definitely worth the effort.
How to develop your skills as a podcast host
Now that you’ve chosen how to record, what equipment to use, and prepared for your recording, it’s time to talk about how to host your show.
Mastering the craft of podcasting takes study, practice, and dedication. Just like basketball, design, music production, teaching, writing, painting, or any other craft you can’t expect yourself to be a professional if you have never done it before. Give yourself the grace and the resources to actually practice and improve as a podcaster.
There are multiple factors that go into making someone a great host, but here are some basic things to keep in mind before you record your podcast:
- Get comfortable with some small talk, jokes, or a lighter conversation topic
- Make sure everyone is wearing headphones, sounds good, and doesn’t have any distracting background noise around them
- Read over your podcast script with your guest to familiarize them with the plan
- If anyone makes a mistake, simply pause and say it again
- If a loud distraction like a siren happens, pause and resume after the sound has passed
- Make sure you use proper mic technique when recording
- Drink some warm tea or water
Once you’ve reviewed this checklist, it’s time to run a practice recording and get started.
Practice, practice, practice recording your podcast
As we have mentioned a few times, it is always a good idea to do some test recordings prior to your actual recording time. Review these recordings with high-quality studio monitors or headphones and listen for any issues with the recording.
If you are unsure if you have a good recording setup or would just like some further tips, feel free to send us your test recording. Doing multiple test recordings will also help you to better learn and become more comfortable with your recording setup. As with anything, practice makes perfect. Follow these simple tips and become a master with the tools you have.
Last but not least, after all of the preparation and practice, take a deep breath and record your episode.
Podcast editing
Congrats! You’ve successfully recorded an episode of your podcast and it’s time to edit it so you can share it with the world.
When you are ready to export your audio files for editing and mixing, we recommend keeping them in a lossless format such as a WAV file. We also recommend exporting each individual track (all audio from guests, any music, other sound effect, etc) separately so your engineers will have the max amount of opportunity to clean up and improve your audio quality.
Best export settings for editing, mixing, and mastering:
- Bitrate: 24 bit
- Sample Rate: 48 khz
- File Format: WAV
- If you choose to have your podcast mixed and mastered by Resonate, our team will ensure that each episode of your podcast is properly exported to match the latest digital streaming standards.
Recommended reading: The ultimate podcast editing guide
You’ve nailed how to record a podcast, now what?
Editing your podcast
Once you’ve recorded your episode, it’s time to edit and package it for publishing to Apple, Spotify, Google, and other directories.
The editing process can be broken into a few sections:
- Editing out mistakes (ums, likes, coughs, unwanted content)
- Arranging content (intro music, baked-in ad, conversation, outro music, etc)
- Mixing (adjusting levels and processing the audio)
- Mastering (Polishing your audio and optimizing for streaming platforms)
Learn more about how to edit your podcast like a pro in this guide here.
Transcribing your podcast
Transcribing your podcast can help you save time editing your podcast, improves accessibility for listeners who have impaired hearing, and can boost your website’s SEO.
Some podcasters transcribe their show immediately after recording so they can skim through a document and make edit notes. Others transcribe the final mixed recording of their episode and share it on their podcast website or email newsletter. Learn more about podcast transcriptions in our guide here.
How to make cover art for your podcast
Thomas J. Watson Jr, former CEO of IBM, famously said that “good design is good business.” We agree. It’s crucial to create a clear brand identity for your podcast to make sure it stands apart from the crowd.
We think that good cover art is simple, bold, and relevant.
It needs to be simple enough that it looks good when it’s a tiny thumbnail in a listening app. It needs to be bold to stand out from the crowd and create a crisp identity for your brand. And it needs to be relevant to the theme, style, and messaging of your podcast audio.
Learn about the technical specifications your artwork needs to meet in our guide on how to make the perfect podcast cover art.
How to make a podcast intro
A good podcast intro creates a clear sonic branding for your podcast. There are a lot of different ways to approach the intro. The most popular intro is to simply play bumper music at the very beginning and end of your podcast for 15-30 seconds. Some podcasts will have a cold open (30-second clip from the episode) followed by their intro music. Other podcasts don’t have an intro at all.
Try to create a podcast intro that complements the artwork, message, and overall brand aesthetic of your show. One way to do this is to choose the right podcast intro music. Need help? Check out our guide on where to find royalty-free podcast music.
How to release your podcast
Ready to share your podcast with the world on Apple Podcasts, Spotify, Google, Audible, and other directories? All you need to do is sign up for a podcast hosting platform, copy the link to the RSS feed they create for you, then submit that link to all of the directories one time. Each individual platform will take 5-12 days to approve your show, then after that you can publish new episodes and they will go live within a few hours.
How to submit your podcast to directories:
- How to submit your podcast to Apple Podcasts
- How to submit your podcast to Spotify
- How to submit your podcast to Google Podcasts
- How to submit your podcast to Audible
- How to submit your podcast to TuneIn
Learn more on our guide to podcast directories.
Other FAQs
How can I record a podcast for free?
We recommend that new podcasters invest $100-200 to capture high-quality audio for their podcast at a minimum. But if you want to try out podcasting for free or just don’t feel ready to commit to buying equipment, there are tools that can let you try out podcasting for free.
If you’re looking for a free and easy way to record audio for your podcast, check out our free online voice recorder.
Anchor offers 100% free to use tools for recording, editing, and hosting your podcast. Their mobile app lets you do everything on the go and it’s a good way to test out whether podcasting is a good medium for you.
If you go the route of making a podcast for free, we still recommend that you use headphones with a mic and a quiet recording environment.
You can also host your podcast for free on RedCircle.
As with everything free, there’s always a catch. If you use Anchor to host your podcast you can’t claim your podcast in Apple Podcasts Connect to see all the extra analytics from Apple since Anchor uses their own account to set up your show. If you host your podcast on Redcirlce you can’t integrate third-party analytics like PodTrac, Blubrry, or RadioPublic because they don’t support that feature.
Can you record a podcast without a mic?
While you can record a podcast using the built-in mic on your smartphone or laptop, we do not recommend this. The audio quality of your show is one of the most important aspects of making a quality podcast. And you can get a high quality sound for your show by simply buying a $69-99 USB mic to record through your laptop.
We recommend starting with the Audio Technica AT2005 ($79) or the Samson Q2U ($69). Find the perfect mic for your budget in our ultimate podcast microphone guide.
How do I make a video podcast?
Every day more and more listeners are tuning into podcasts on YouTube, and every day more and more podcasters are making video podcasts. Podcasts have historically been an audio-first medium, and they have centered around RSS feed technology, where you publish an episode on your feed and all the podcast listening apps can read your feed and distribute it for you. But as podcasts grow in popularity, YouTube is beginning to take a larger share of the listening market.
We do not recommend publishing your podcast on YouTube as a static image because YouTube is designed to encourage highly engaging video content, not static images. But there are several ways you can approach making a video podcast.
How to make a video podcast:
- Record your remote video call on Zoom or Riverside like Indie Hackers
- Create a dynamic visualizer for your episode like Even the Rich by Wondery
- Create a slideshow for your show and overlay it like Pod Save America
- Record video in your studio like The Ground Up Show
As you can see there is more than 1 way to create a successful video podcast. Learn more about how to start a video podcast here.
How do I record a sermon?
Recording a sermon and releasing it as a podcast is a great way to archive the life of your church and reach a wider audience with your message.
There are a few different methods for recording your sermons. Get 3 different equipment packages that you can use to record your churches sermons in our guide on sermon recording equipment.
Where do I host a podcast?
There are a lot of excellent options when it comes to hosting your podcast. At the end of the day, each platform gives you the same core feature: an RSS feed that stores your podcast. But there are also a lot of additional features that you can get such that differentiate each brand.
You can distribute your podcast to all the top directories and see analytics all in the same app you use to manage your podcast production with Resonate Podcast Hosting. At $25/mo you get one-click posting, unlimited downloads, unlimited Show Users, an embed player, and live chat support.
Need help finding the perfect podcast host? Check out our guide on the best podcast hosting platforms.
What’s the best time to release a podcast
We typically recommend publishing new podcast episodes at 5 AM EST on weekdays. According to research from the podcast host Megaphone, episodes posted on Tuesdays and Wednesdays from 2-5 AM get the most downloads.
You can learn more about the nuances of choosing the best time to release your podcast in our blog on when to release your podcast.
Can you record a podcast with Airpods?
Yes. We have heard many of our clients record remote interviews using AirPods built-in mic. While they are not going to sound as good as one of the dynamic microphones we recommend, they are much better quality than a built-in mic on your laptop or smartphone.
If you have to record on AirPods, make sure you record in a quiet environment and try not to walk around or move a lot during your recording to avoid picking up additional noise.
Can you record a podcast using Android?
Yes. You can record on Android using Anchor, Spreaker, or Podbean’s recording apps. Each of these apps let you record your audio for free, but only Anchor also offer free distribution.
If you do record your podcast on a smartphone, we highly recommend using a USB mic like the Audio Technica AT2005 ($79) or the Samson Q2U ($69) plugged into your phone through a USB adapter. These mics are cheap but will immediately boost the audio quality of your show and make the listening experience far more enjoyable for your listeners.