It is not uncommon for the Resonate Recordings team to provide input to our clients on how to simplify their recording processes. The reality is, there are so many variations to choose from.
Since the options seem to be endless, it can make your head spin…especially if you’re not a gadget person. Because many of the podcasters we work with are just looking for simple, easy, reliable solutions to record their podcast, we wanted to make a resource available that walks you through our preferred method of recording podcast audio. Our recommendation? Using a handheld recorder, like the Zoom H6. The simplicity and user-friendliness of the Zoom H6 makes it our top choice for recording setups as it’s straightforward and reliable.
Get your Zoom H6 using this link.
What is a Zoom H6 exactly?
A recorder like the Zoom H6 essentially replaces your computer and allows you to record your audio files directly onto an SD card that can easily be popped out to upload the content. It also works with external components like microphone and headphones, so you aren’t sacrificing quality for simplicity. Using a recorder usually eliminates the need for computers, interfaces or DAWs. Because we get a lot of questions from podcasters about how to use it and the best ways to optimize it for podcast recording, we’re making this tutorial available to you.
What’s In The Box?
If you’re purchasing the Zoom H6 new and boxed, here’s what you’ll find inside:
- Zoom H6 recorder
- MS microphone attachment*
- XY microphone attachment*
- Windscreen
- Carrying case
- USB cable
- 2GB SD card
- 4 batteries
- Cubase LE Software
*The MX and XY are both stereo microphones, so we recommend getting a dedicated microphone instead of using these included mics for recording your audio. We recommend you get a separate microphone like the AT2005 for great quality at an affordable price.

Getting to know your Zoom H6
On each side of the recorder you’ll see you have 2 inputs. Inputs 1 and 2 on the left, inputs 3 and 4 on the right. These inputs are combo inputs that work with either XLR or TRS connections. On the left side you also can see the SD card slot where you put your SD card in, an ⅛” headphone jack, the volume control as well as the power switch.
On the opposite side you have a 5v USB power port where you can transfer files to the computer, or use an external power supply (not included with the recorder), the Menu button and scroll wheel (for navigating the menu) as well as inputs 3 and 4 for your external microphones.
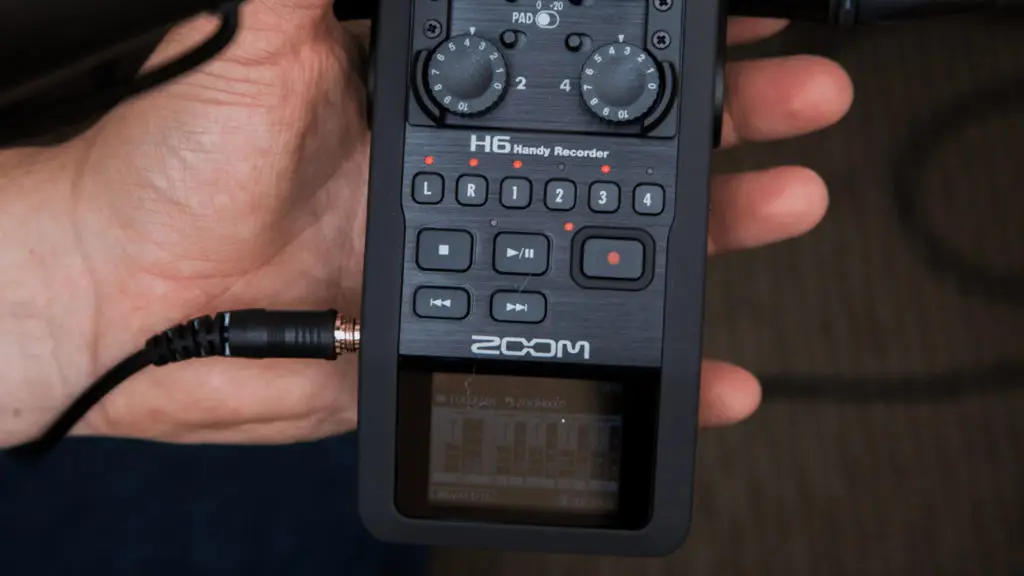
On the front of the Zoom H6, each channel has a gain knob and a pad feature (to control input levels), as well as target buttons for targeting the left and right to record with one of the external microphones that attach on top. You will also see you have indicators for channels 1, 2, 3 and 4 for the coordinating microphone inputs on the recorder. Make sure that when you are recording, the channels selected and the inputs being used are coordinating! You also have basic Play, Stop, Pause, Record, Fast Forward and Rewind features.
Setting up your Zoom H6
Basic Setup
Before you can begin recording, make sure you have fresh batteries in your Zoom H6. We recommend using lithium batteries as they’ll last longer. With regular alkaline batteries, you can get up to 3 hours of recording. When you turn on the recorder, you’ll need to set the language, date and time. Once you’ve done that, just hit Record and it’s going to take you to the main screen for formatting.
Formatting Your SD Card
After the initial setup the first thing you want to do is you want to reformat your SD card. To do that select Menu (on the right side), scroll down to SD Card, then select Format. Confirm by choosing Yes. Now you’re ready to record!
Setting Your Recording Format
Next, you’ll need to choose the recording format. If you go down to Record and then select Record Format, make sure that you have the 44.1 kilohertz, 24 bit WAV file option selected as this will be best for podcasting purposes.
Choosing Your Folder
By default you’re going to be recording into FOLDER01 which is an empty folder. Hit Record and select that folder. So now you’re in FOLDER01. If you’re going to be recording multiple episodes, we recommend you record into two separate folders that way your files are more organized. If you record another episode, you can select FOLDER02 for the additional recording. Just keep in mind that whatever folder(s) you choose is where you’ll go to retrieve the files from your computer!
Settings
Under the INPUT & OUTPUT section, you have multiple options like Lo Cut, Compressor/Limiter, etc.. We recommend leaving these as-is and letting your post production team handle all the processing. But if you are using a condenser microphone, you’re are going to need to select 48 volt Phantom Power.
Setting your levels
Once your initial set up is complete it’s time to plug in the microphone(s). Once you plug in your microphone(s), you’re going to select the corresponding channel that you’re recording on. Once you choose the channel, the red light on the coordinating channel flashes. If you bring up your gain while you’re talking into the microphone (we recommend you bring it up about halfway), you should be able to see that you’re getting signal. On the meter you want to be hitting around -12db. We recommend you test the input gain to have it average as close to -12db as possible. If you are too loud it will distort and the clip indicator light will blink. If you have a second microphone, you can select the second track that will be used and then adjust the gain on that track as well with the same process.
Recording Your Content
Once the levels are set you’re ready to record! When you hit the Record button, you’ll see that the track timer turns red and you start seeing the numbers change. Whenever you’re done recording you can hit Stop. If you need to record an additional take, you simply hit Record again and then Stop when completed. When you record multiple takes you’ll see the recorder automatically names the consecutive takes (ie: Zoom0001, Zoom0002, Zoom0003) because you’re recording an additional file(s).
Uploading Your Content
When you’re done recording, it’s time to transfer the files to the computer for post-production. When you plug your USB cable into your computer, go to MENU (on right side of recorder) on your Zoom and choose USB, select SD Card Reader and then you will see it sync with your computer. On your computer’s finder/search interface the Zoom H6 content is going to be labeled H6_SD. Locate the folder you selected at the recording phase to download the content to your computer. Simply locate the tracks wanted and download to your local storage. As an aside, it’s always best practice to rename your files with an episode name/number and signifying whether it’s the host or guest track (ie: EPISODE 1 – HOST.wav), instead of leaving them as Zoom0001, etc.. By doing this you ensure that you know exactly what track is what.
There are a lot of options for you to choose from for recording your podcast episodes. But hopefully you can see from this tutorial and instructional guide why we recommend the Zoom H6 recorder for most of our client’s needs. It’s incredibly easy to use and is easy to troubleshoot problems you may encounter. But we realize you may have some additional questions we didn’t answer here. If you have more questions, you can email us at help@resonaterecordings.com or schedule a call with a team member here. Thanks again and happy podcasting!